This post may contain affiliate links that grant me a small commission at no extra cost to you.
I've wanted an embroidery machine forever - here's everything I learned about the best cheap embroidery machine for beginners.

I feel like all crafty people have thought to themselves, "Wow, I really would love to have an embroidery machine!" Just me? Okay fair enough. I've dallied with enough forms of embroidery in the past, always feeling like an embroidery machine was out of reach. I've done hand embroidery, but never really had the artistic application or the consistency for it. For example, I've always been the person to dream up an incredible painting, but have absolute no skill when it comes to actual brush strokes. I love to design things on the computer, so if I could have a machine do the practical stuff, the possibilities would be endless!
I just always figured embroidery machines were thousands of dollars. You know when you go to the craft store and they have an entire section dedicated to all these spaceship-looking machines for the price of a used car? Super intimidating. Then, I saw a TikTok of a girl embroidering some tank tops with a machine that looked like a slightly larger version of a sewing machine. I took it as a sign and began feverishly researching everything I could about cheap, beginner-friendly embroidery machines. Then, for my birthday this year my husband suggested we buy one! I was super excited.
There are so many good resources online about embroidery machines for beginners. I watched a lot of TikToks and YouTube videos, but I didn't feel like there was all the information I needed to get started all in one spot. I'm hoping this post can be a good tool for all embroidery machine beginners out there, and I'm hopeful I can condense everything down so you get the answers you're actually looking for. This is the blog post I wish I had when I was getting started!

If you like this tea towel and don't feel like doing it yourself, here is a link to my Etsy Shop!
I had this question myself when I got started. For some reason, the world of embroidery machines is shrouded in misconception about its level of difficulty (IMO). In my experience, operating an embroidery machine is not much more difficult than operating a sewing machine. There is definitely an element of computer work that you don't need to know when sewing something, but threading the machine, winding the bobbin, cleaning out the bobbin case, etc. is exactly the same as a sewing machine. In fact, at times I find using an embroidery machine easier than a sewing machine because you don't have to move the fabric through the machine. If you've never ever touched a sewing machine in your life there will definitely be a little bit more of a learning curve. I knew how to operate a sewing machine before purchasing my embroidery machine (nothing crazy - I only knew the basics) and I was fine.
Let me break down everything I learned before buying my embroidery machine:


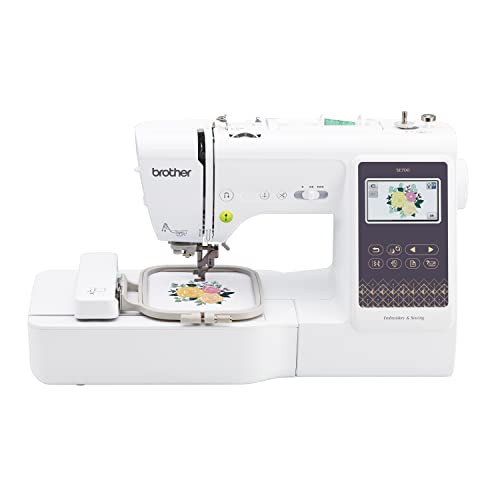
4" x 4"

I have this machine and I'm really happy with it. Full disclosure, I bought mine when it was on sale at Wal Mart for $380. I did have some initial issues with the machine (turns out I received a faulty one), but Wal Mart took it back and gave me a brand new one! I've had no issues since then.
4" x 4"
This is basically the same thing as the cheapest model but it is a combination sewing and embroidery machine.
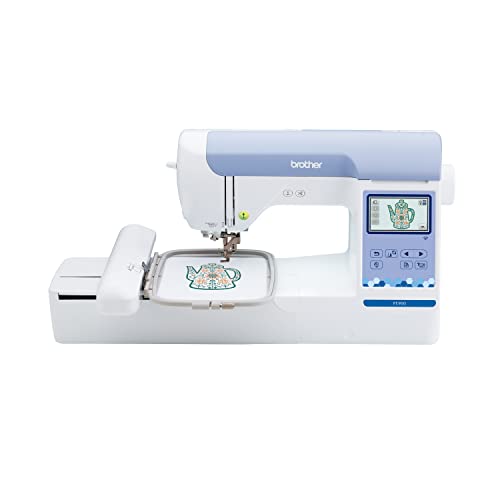
5" x 7"
This machine has a bigger hoop capacity.
Your embroidery machine should come with a few fonts, a few preset designs, and some frames. For most people, this won't be enough to work with so you'll need a an embroidery software. If you're only looking to personalize things and are happy with the preset fonts, you might be able to get away with this and Artspira which we'll talk about now. With your Brother machine you get access to Artspira, Brother's embroidery app. This is a nice app, and here you can purchase embroidery files, access free designs, and sketch your own designs using your fingers. I personally found that I wanted to make more custom designs. I use Artspira mostly when I want to write something in my own handwriting and have it stitched out. For quite literally everything else, I use something called Embrilliance.
Artspira is a mobile app and Embrilliance is a software for your computer. Embrilliance is compatible with Windows and Mac.
Embrilliance Essentials is what I use and what I've found to be the most effective and the most affordable. There is a free version called Embrilliance Express Mode but it's really for downloading the software and just playing around with the functions. With Essentials, you'll be able to import design files from Etsy and fonts that you can combine and size. The nice part is it's just a one time fee of $139.
No. So here's the thing, you won't be able to take any logo, font, or photo and embroider it without something called Stitch Artist. This is by the same company as Embrilliance. It's a one time fee of $169 and even I haven't gotten into this complex of projects yet. My advice is to start with the basics and build your way up. For example, get your machine and start with the preloaded designs. Then, maybe purchase Embrilliance. And then eventually purchase Stitch Artist.
You may be asking why you can't just upload a photo into your embroidery machine and allow the computer to digitize it. The machine only recognizes embroidery files. You have to tell the machine exactly where to stitch and how many stitches to use with each design. There is currently no reliable software*** for auto-digitization of JPEG, PNG, SVG files. It's done by hand using a computer program. I'm sure in the next few years with AI there might be something to this effect but for now, you have to use Stitch Artist or something like it. You can upload a photo into Stitch Artist and trace it (we can talk more about this later) but for beginners, you just need Embrilliance.
******** It has been brought to my attention that Artspira's paid subscription ($12.99/month) enables you to upload your own photos and it will digitize them for you. I think the thing to remember is that this isn't a perfect system, but it might be worth a try if you're interested!
There are lots of people who sell embroidery files online, but Etsy is a big one that I really love to use. These files are usually less than $5. These sellers have done the work for us and have digitized designs into embroidery files (PES files). You can always google "embroidery files" and there are even some good free ones online if you just hunt around. Once you download these files, you can upload them into Embrilliance and size/color them and add them with a font you like.
Like with embroidery files, embroidery font files can be purchased from sellers online. Embrilliance Essentials comes with a great starter pack of probably around 20 fonts which is included in your purchase. For Brother machines, you'll want to look for BX font files. The reason is BX fonts have an entire alphabet of letters that can be typed out and aligned. Fonts that are not BX fonts will be an alphabet of letters that you will have to size and line up yourself. For example if you buy a BX font file, you can type out the word "BRIDE" and format the spacing, sizing, etc. of this entire group of letters to be consistent. If you buy a non BX font file, you would have to take the letter "B" and then the letter "R" and so on and so forth and line everything up. It's tough to explain, but most font packs on Etsy are BX files so don't worry too much.
The BX issue comes up with monogram alphabets and stuff like that. With single letter monograms and crests, you typically don't need a BX file since you're only using one letter at a time.
There are honestly a million little accessories that make embroidery easier, but here are my personal essentials (and things that don't come with your machine):
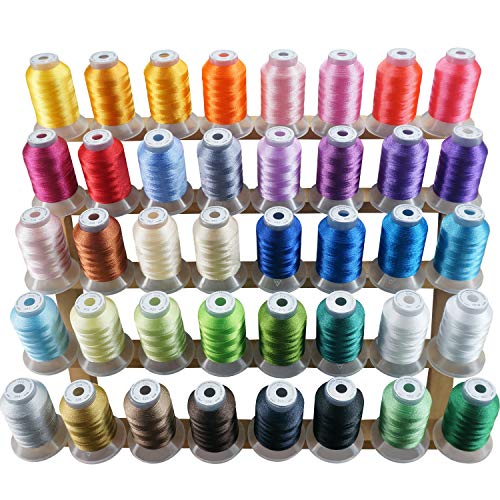
Your machine will come with a few pre-wound bobbins but it won't come with the embroidery thread. I have this thread from Amazon and I love it.


There are several different types of stabilizer. They come in either rolls or precut sheets. I think the precut sheets are easiest for beginners. For absolute beginners, I would start with Tearaway stabilizer first. But here is my guide on the types of stabilizer and what types of projects are best for each kind:
Good for cotton, non-stretch materials like tote bags.
Good for stretchy material and t-shirts.
Good for DIY projects like coasters and is best to put on top of towels so that the thread doesn't sink into the towel fibers.
No show mesh is good for stretchy materials that are light in color. For example, white t-shirts, white tank tops, etc. This ensures there is no shadow of the stabilizer on the outside of the shirt.
I like having all of these kinds of stabilizers on hand just in case, they're not that expensive on Amazon. But if you have to start with something I would pick Tearaway.
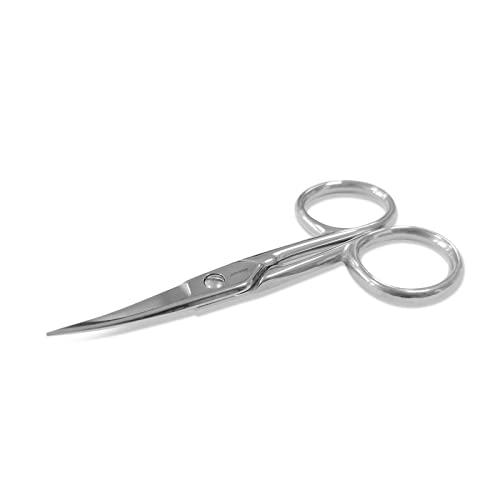
Your machine will come with some little scissors, but I upgraded to these because you will want to cut close to your fabric without cutting the fabric itself.
I personally like to float almost all of my projects when hooping so you'll need this spray for that. We'll talk about this later, I know it won't make any sense for right now!
These are pretty much the basics.
I would recommend starting on a canvas tote bag or a non-stretch cotton material like a cocktail napkin or a tea towel. Definitely be prepared to test, test, test when you first get your machine! I have an entire tea towel just dedicated to my test stitches while I figure out sizing and everything.
Stretch materials are a little bit harder to hoop and figure out so I would start simple! Definitely don't start with any thick materials like leather or denim.
There are a lot of videos online on how to hoop your items, but I personally like to float all of my projects on the hoop. This means that you'll place a sheet of stabilizer between the two pieces of your hoop and tighten it. Then, spray this surface down and place your item on top of the hoop. There are disadvantages to floating, some people say the adhesive can gum up your needle over time, you have to clean your hoop more often because of the adhesive gunk. Also if you don't properly tack down your project, you could get wrinkles and gathering in your finished project.
The advantages to floating are it's easier to line up your projects and to get the machine to embroider at the exact right spot for your items. It's also so much easier than hooping thick materials. You can also embroider in tough to reach areas like collars and cuffs. Do your own research to determine which method of hooping works for you!
There is a good troubleshooting guide in your machine's manual, but here are some things that weren't in the manual that I came across.
Make sure that you are using the provided thread nets over your thread spool so the thread doesn't pull off the spool too fast. It's very important that the thread maintains the right amount of tension. Not too tight and not too loose. Your manual has more information on all this but I didn't realize how important this really is and was something I struggled to figure out.
Don't resize designs you buy from Etsy on the machine itself. Do all your resizing within the Embrilliance software. I've found that sometimes when designs get too small, there is too much density in certain areas. This can be tough for the machine and needle to work through.
I hope this helps you get started in the fun world of machine embroidery! Let me know if you'd like me to cover any other topics related to machine embroidery and feel free to email me if you have any other specific questions!